Thermal Cracking of Middle Frames of Aluminum Alloy ADC12 Mobile Phones (Part One)
Abstract: The causes of thermal cracking in the middle frame of die-cast ADC12 aluminum alloy mobile phone were analyzed by means of direct reading spectrometers, scanning electron microscopes and metallographic inspections. The results showed that the hot crack occurred at the grain boundary, there were a lot of gas holes and carbon oxygen inclusions distributed on both sides, and there were more nubby β (Al9Fe2Si2) brittle phases, which hindered the feeding channel of the alloy, increased the alloy's brittleness and deteriorated the mechanical properties of the material. At the same time, the internal structure was unevenly distributed, resulting in great thermal stress due to the influence of thermodynamic factors in the cooling process, which caused thermal cracks in the middle frame of the mobile phone in the die-cast process.
With the development of 5G communication, the traditional metal casing has an obvious shielding effect on the signal of the mobile phone. At present, the mainstream appearance material for smart phones is double glass or ceramic plus aluminum alloy middle frames. Compared with the deformed aluminum alloy mobile phone middle frame, the die-cast aluminum alloy middle frame has the advantages of high rates of finished products, simple processes and high production efficiency. The ADC12 aluminum alloy die casting part is very suitable for mass production due to its high yield, good surface quality, high dimensional accuracy, and less subsequent processing, and is widely used in automotive and electronic communication fields. As the core structural member, the middle frame of the mobile phone plays an important supporting role in the smartphone and has high requirements in terms of strength. In casting production, hot cracks may bring serious consequences, especially the mechanical properties, resulting in scrapped products. At present, the research on ADC12 aluminum alloy mainly focuses on the optimization of alloy composition. The distribution and the effect of defects on the mechanical properties of alloys are rarely reported. The hot cracking of the mobile phone's middle frame made by ADC12 aluminum alloy die casting was observed and analyzed by means of optical microscopes, scanning electron microscopes, and direct reading spectrometers, and then improvement measures were proposed to avoid such defects in the production process of mobile phone middle frames.
1. Test materials and methods
1.1 The composition of alloys
The main raw material of ADC12 aluminum alloy in this test is regenerated aluminum. The chemical composition of the sample near the intercepted fracture was analyzed by a direct reading spectrometer, and compared with the standard composition. The results are shown in Table 1. It can be seen that the composition of the hot cracked sample is all within the standard range.
Table 1 The main chemical composition wβ of ADC12 alloys /%
| Projects | Si | Mg | Fe | Ti | Cu | Mn | Zn | Al |
| Standards | 9.6 to 12.0 | Less than and equal to 0.3 | Less than and equal to 1.3 | Less than and equal to 0.3 | 1.5 to 3.5 |
Less than and equal to 0.5 | Less than and equal to 1.0 | Margin |
| The sample with hot cracks | 10.0 | 0.2 | 0.7 | 0.03 | 1.7 | 0.2 | 0.8 | Margin |
1.2 Die-cast processes
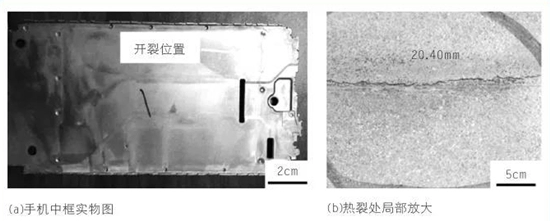
The clamping force of the die-cast machine used is 300kN, the thickness of the material handle 15mm, the mold temperature 200℃, the injection force 330kN, the punch diameter 60mm, the injection pressure 116MPa, the injection time 3.5s, the cooling time 2.0s, and the retained time of the mold 8.0s. In this test, the mold was preheated to 150°C (the actual temperature of the mold surface) by the mold temperature machine, and then the die-cast process was performed. The action stroke positions of the die handle in the die-cast process were as follows: the first fast position was 100mm, the second fast position 240mm, the pressurized position 280mm, and the tracking position 375mm. The macro photo of the produced mobile phone middle frame and its hot cracks is shown in Figure 1. It can be seen from the figure that the hot crack occurred at the hot node of the die casting part. This is because the temperature of the molten metal decreased rapidly at the end of the solidification of the alloy. The temperature of the molten metal decreased rapidly and the flow rate of the alloy liquid was reduced. Shrinkage porosity and shrinkage cavities easily generated, and the feeding effect of the metal liquid on cracks was reduced.

Figure 1 The hot crack of the mobile phone's mid frame
1.3 The analysis of organizational performance
The fracture morphology, metallographic structure and micro-area composition of the cracked samples were analyzed by means of analysis and testing methods such as Phonex scanning electron microscopes and metallographic microscopes.
2. Test results and discussions
2.1 The analysis of fracture morphology
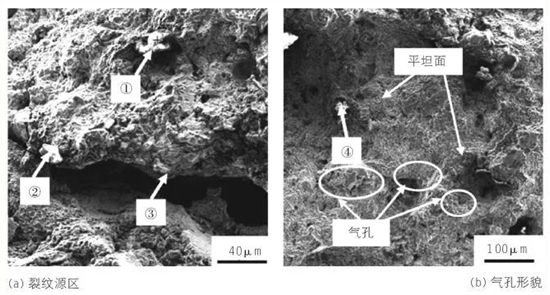
Figure 2 shows the fracture topography at the hot crack of the middle frame of the mobile phone. From Figure 2a, it could be seen that the fracture topography at the hot crack was relatively rough; its edges were unevenly staggered, and there were inclusions distributed on both sides and around the crack. It can be judged that the hot crack occurred at the grain boundary, because when the alloy solidified at the semi-solid stage, the thermal stress at the grain boundary gradually increased. At this time, the strength limit of the alloy was small, and the strength limit of the semi-solid material was lower than that of the grain boundary. The stress and strain caused by shrinkage in the final stage of solidification exceeded the limit range that the material could withstand, which was the main cause of thermal cracking. The hot cracks generated at this time couldn't recover in time. The strength of the alloy would decrease, and the hot cracks would further expand.
It could be seen from Figure 2b that there were brittle fracture areas and ductile fracture areas in the fracture, mainly dominated by brittle fractures. In some areas inside the fracture, a lot of holes were concentrated, which were initially determined to be gas holes. There were many holes and they were distributed widely and relatively dense. It can be judged that the gas hole generated in the die casting process due to the recycling of waste materials seriously reduced the mechanical properties of the alloy. Moreover, a large number of inclusions were distributed around the gas hole. The EDS micro-area composition analysis results of each point in Figure 2 are shown in Table 2. It can be seen from Table 2 that each point contained carbon, oxygen, nitrogen, aluminum, silicon, and iron elements, which were inferred to be mainly carbon, oxygen, nitrogen inclusions and harmful iron phase (β-AlFeSi). It can be speculated that the inclusions originated from auxiliary materials in the die-cast process, such as the mold release agent and granular oil, causing the specimen to have the feature of brittle fracture.

Figure 2 The features of the fracture at the hot cracking
Table 2 EDS analysis results of each point in Figure 2
| Locations | A1 | Si | Cu | Fe | C | O | N |
| 1 | 27.30 | 1.94 | 2.43 | 56.84 | 6.12 | 5.38 | |
| 2 | 42.32 | 33.15 | 12.23 | 3.74 | |||
| 3 | 23.21 | 6.27 | 43.30 | 22.21 | |||
| 4 | 16.39 | 3.73 | 6.32 | 69.55 | 3.37 |